테스트용 DB를 설치 후(DB version 9.2) 디비버나 pgamin 같은 Client Tool로 접속하기 위해서 여러가지 시도해보고 성공하였습니다. 그걸 정리해보도록 하겠습니다.
우선 DB 설치는 yum install로 기본 설치로 진행하였습니다.
DB 설치는 여기를 참고하세요.
저는 최신버전을 다운받으려고 했으나, 빠른 테스트를 위해서 그냥 예전버전인 9.2버전으로 설치했습니다.
1) YUM install
[root@ysbae ~]# yum install -y postgresql
Loaded plugins: fastestmirror, product-id, search-disabled-repos, subscription-manager

This system is not registered with an entitlement server. You can use subscription-manager to register.

Loading mirror speeds from cached hostfile
 * base: ftp.kaist.ac.kr
 * extras: ftp.kaist.ac.kr
 * updates: ftp.kaist.ac.kr
Resolving Dependencies
--> Running transaction check
---> Package postgresql.x86_64 0:9.2.24-8.el7_9 will be installed
--> Finished Dependency Resolution

Dependencies Resolved

============================================================================================================================
 Package                       Arch                      Version                           Repository                  Size
============================================================================================================================
Installing:
 postgresql                    x86_64                    9.2.24-8.el7_9                    updates                    3.0 M

Transaction Summary
============================================================================================================================
Install  1 Package

Total download size: 3.0 M
Installed size: 16 M
Downloading packages:
postgresql-9.2.24-8.el7_9.x86_64.rpm                                                                 | 3.0 MB  00:00:00
Running transaction check
Running transaction test
Transaction test succeeded
Running transaction
  Installing : postgresql-9.2.24-8.el7_9.x86_64                                                                         1/1
  Verifying  : postgresql-9.2.24-8.el7_9.x86_64                                                                         1/1

Installed:
  postgresql.x86_64 0:9.2.24-8.el7_9

Complete!
2)Cluster 등록
[root@ysbae ~]#  postgresql-setup initdb
Initializing database ... OK

[root@ysbae ~]# systemctl enable postgresql.service
Created symlink from /etc/systemd/system/multi-user.target.wants/postgresql.service to /usr/lib/systemd/system/postgresql.service.
[root@ysbae ~]# systemctl start postgresql.service

[root@ysbae ~]# ps -ef |grep postgres
postgres   967     1  0 14:36 ?        00:00:00 /usr/bin/postgres -D /var/lib/pgsql/data -p 5432
postgres   970   967  0 14:36 ?        00:00:00 postgres: logger process
postgres   972   967  0 14:36 ?        00:00:00 postgres: checkpointer process
postgres   973   967  0 14:36 ?        00:00:00 postgres: writer process
postgres   974   967  0 14:36 ?        00:00:00 postgres: wal writer process
postgres   975   967  0 14:36 ?        00:00:00 postgres: autovacuum launcher process
postgres   976   967  0 14:36 ?        00:00:00 postgres: stats collector process
root      1186  1170  0 14:38 pts/0    00:00:00 grep --color=auto postgres
3)postgres 접속 및 패스워드 변경
[postgres@ysbae:~]$ psql
psql (9.2.24)
Type "help" for help.

postgres=#
postgres=# \password postgres
Enter new password:
Enter it again:
postgres=#
postgres-# \q
끝.
밑에부터는 Client 접속과 관련되서 설정하는 부분입니다.
우선 postgres DB에서 connection과 관련된 부분은 두부분을 봐야합니다. postgres.conf 와 pg_hba.conf입니다.
postgres.conf는 서버쪽 connection의 설정이고, pg_hba.conf는 client쪽 connection 설정이라고 보면 됩니다.
1)
기존에 postgres.conf쪽부터 확인해보면, 아래의 connection and authentication 부분에 listen_addresses 와 port 부분이 주석처리되어 있습니다. 어떤 ip를 받을것인지 어떤 port를 받을것인지에 대한 정보입니다.
#------------------------------------------------------------------------------
# CONNECTIONS AND AUTHENTICATION
#------------------------------------------------------------------------------

# - Connection Settings -

#listen_addresses = 'localhost'         # what IP address(es) to listen on;
                                        # comma-separated list of addresses;
                                        # defaults to 'localhost'; use '*' for all
                                        # (change requires restart)
#port = 5432                            # (change requires restart)
아래의 정보로 변경합니다.적용하려면 재기동이 필요합니다.pg_hba.conf까지 변경 후 한번에 재기동하기 위해서 설정만 변경합니다.
To-BE
listen_addresses = '*'
port = 5432
2)
pg_hba.conf를 확인해보면 아래와 같습니다.
ipv4에서 현재는 로컬만(127.0.0.1) 연결을 허용하고 있기 때문에 아래에 내용을 추가합니다.
# TYPE  DATABASE        USER            ADDRESS                 METHOD

# "local" is for Unix domain socket connections only
local   all             all                                     peer
# IPv4 local connections:
host    all             all             127.0.0.1/32            ident


# IPv6 local connections:

host    all             all             ::1/128                 ident
# Allow replication connections from localhost, by a user with the
# replication privilege.
#local   replication     postgres                                peer
#host    replication     postgres        127.0.0.1/32            ident
#host    replication     postgres        ::1/128                 ident
TO-BE
모든 ipv4의 ip에 대해서 연결을 허용한다는 뜻입니다. trust는 무조건적인 허용이지만, md5방식으로 접근을 허용하게 하였습니다.
host all all 0.0.0.0/0 md5
두개를 변경 하거나 잘 설정되어있는지 체크한 후 재기동을 합니다.
[root@ysbae ~]# systemctl restart postgresql
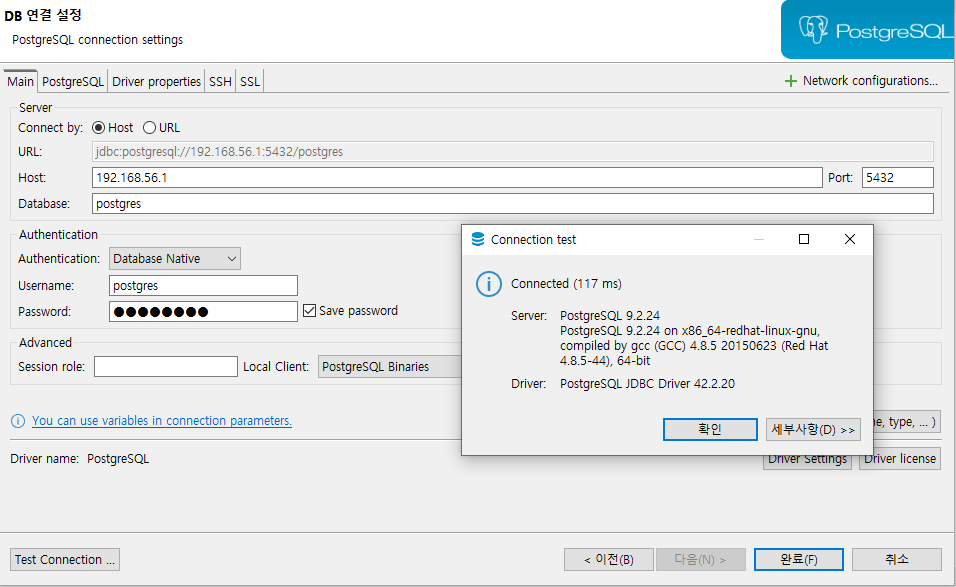
그리고 디비버로 test connection 해보면 성공!
'다른 DBMS > PostgresDB' 카테고리의 다른 글
| 오류: 기타 다른 개체들이 이 롤에 의존하고 있어, "유저명" 롤을 삭제할 수 없음 (0) | 2024.05.29 |
|---|---|
| [postgresql] 데이터타입 총정리 (0) | 2024.04.02 |
| vacuum 과 vacuum full 차이 보기 (pageinspect extention 사용) (0) | 2024.03.31 |
| postgres extention contrib 확장팩 설치 (0) | 2024.03.30 |
| [pg15] DATA Directory 변경하기 (0) | 2023.03.29 |

댓글